Monday, June 13, 2016

Glamp Stitchalot

The first weekend of June was blur of packing, traveling, sewing and making new friends. That's right, you guessed it - GLAMP STITCHALOT! A quilter's retreat like no other. About 200 people from all over the world, descended on Ann Arbor, MI to attend this event the Kensington Hotel.

The event was well organized by Pink Castle Fabrics and their lovely staff. I loved meeting the teachers who are authors and fabric designers (and celebrities in the quilting world). 
We were divided into six groups (six teachers) and were given a bracelet to wear, at check-in, indicating our color group. There were two sewing rooms - one large, one smaller. I was in the large room.


The teachers each designed a row of blocks (or two) that were created exclusively for Glamp. They also created a design for their signature t-shirts that we could pre-order or buy at the event at the "pop-up shop". 

I rented a machine for the event - a Janome skyline s7 which is the top of the line when it comes to precision sewing. It comes with a hefty pricetag but we were offered a deep discount and an accessory bundle if we wanted to purchase it. I normally use a Singer Quilter Confidence machine which is fine for me. I just really wanted to take an expensive machine out for a test drive. There was a bumpy start and a learning curve (on my part) but with some guidance from the helpers, I finally got the hang of it by the last day of the event. What I liked most about it was the ease of changing the stitch length - with the touch of the digital screen. Yes, it was very cool and high tech. I might purchase one in the future when I have the money, but my Singer is fine for now.

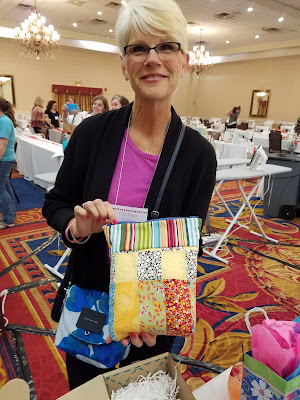
There was also a "pouch swap" for those that signed up for it. The task was to sew a pouch and fill it with goodies to give to your assigned swap partner on the first night. Some of us had to "facebook stalk" our partners so we would know what they looked like. Here is Patty Magaw holding the bag I made her.
Here is the pouch I received from my secret swap partner. Thanks Jen Johnston for the lovely pouch and the Tula Pink bag it came in! Also, thanks to Joy McCalvin for the lovely Tula Pink fabric! I just mentioned that I am a fan of her fabrics and you very generously gave me some! I love it and I appreciate it so much!

 I have so much to share with you - including pictures with the teachers! You don't want to miss that. Also pictures of the projects and my progress once i got home (back to the real world). 
Elizabeth Hartman with me. 


Elizabeth Hartman's design - like the window surprises?
Me with Carolyn Friedlander

My pal Terri - love her quirk


One block done. Paper piecing is not easy. 

got two curved pieced blocks done during class.


"binge watch" by Monica


Penny Layman
Monica Solorio-Snow aka Happy_Zombie
Penny's design - paper piecing!

My pal Debbie Schmersal and Me!
HAppy Crazy Manequin in a local shop
Terri Swallow, Violet Craft, me and Heather Shields
What I have done now. Work in Progress.

Sunday, May 22, 2016

Starting my La Passacaglia Quilt


My latest project is a La Passacaglia quilt from the Millefiori Quilts book by Willyne Hammerstein. There is a whole group devoted to this on Facebook that I have joined. I bought the book and the templates and paper pieces for the entire project. 


I am so inspired by all the color choices in the posted pictures. The picture that had me drooling and got me started on this adventure was by Lilabelle Lane Creations https://www.facebook.com/lilabellelanecreations/photos/pb.127463237601276.-2207520000.1463890856./260547950959470/?type=3&theater who used all Tula Pink fabric (one of my favorite fabric designers). Basically, it is EPP (English Paper Piecing) on steroids. 


The funny thing about this project was something my mother reminded me of. When I was just starting quilting and really getting interested in it, I took mom to a quilters' retreat with me and one of the attendees was working on a postage stamp quilt  - I told mom that I would never work on something that intricate or that required fussy cutting. I just thought it was too much work (at that time). I had forgotten I said that - but mom reminded me. Thanks, MOM. Ha. Ha. I guess I have evolved since then. There are only so many strip quilts you can do before you need a challenge. I guess the moral of the story is "never say never". You may not be interested in something that seems overly complicated today but as your skills improve, the once impossible task begins to look possible and even enticing. These are all basted using thread or fabric glue (I have tried both and prefer thread basting) and they are hand stitched together. This is a good "take-along" project for traveling or sitting in waiting rooms.


previewing colors to go with the stars
beginning the first cog. 


 My first "cog" of many, many more. I think there are between 20 and 30 of them in various sizes.
finished cog #1

cog number two!
More to come so stay tuned! Let me know if you have started your own EPP quilt and how you like it.

Sunday, September 30, 2012

Ghostly upcycled socks

What do you do with a pile of old socks that you were just going to toss into the trash? Well, make ghost decorations for Halloween (of course). You don't have to have any special skills, just a burning desire to be crafty. Tools needed : scissors, marker, a piece of paper, sewing machine (or needle and thread), old socks, scrap of black fabric for eyes and mouth, glue runner.
Step one : gather socks
Step two: cut socks open  - cut down the back to open up the heel.
Step 3: draw a ghost on the sheet of paper and cut it out - this is your template. Lay this template on top of your cut-open sock and trace around it with the marker onto the fabric (you don't have to be real careful). Now cut that out and this is what you should have :
Do this again but lay your template wrong side (flip it over) so that you will have a mirror image ghost to match up with this one. Now just keep doing that until you have as many "pairs" of ghosties as you want. Save your scraps to use as stuffing later - nothing goes to waste!
 
Step 4: Sew -  put a set of ghosties right sides together and sew all around the outside (about a quarter of an inch seam allowance) but leave about two inches open on the long side to flip it right side out.
Step 5: Turn and stuff! put the scraps you saved from earlier and stuff your little friend. Squish it around until it is a pleasing shape. Use your scrap of black material to cut out eyes and a mouth and attach with the glue runner.
 
Step 6: Sew the hole and hang your little ghostie up in his haunt - or string a bunch of ghosties up with fishing line for a major haunting. Muwahaha!
HAPPY HALLOWEEN!!!
 

Sunday, June 10, 2012

part 2> charming baby quilt


Cutting out the 3.5x3.5  tilted squares from the block baby quilt turned out to be a bit trickier than I had originally planned. The first template I made (out of clear plastic) didn't include an orientation arrow or a number to show which side is correct, so the first 3 squares I cut were wrong - there was no fixing them - I had to cut and sew the top row all over again.
 So, learning from my mistake - I made a clear template that included an orientation arrow and a number so I could tell I had it turned right and oriented right. Much better! (I didn't take a picture of the mistake - sorry).

I had to carefully label each block with the row number and block number. (example row 3, block 1 would be 3-1). There were 11 rows of 9 blocks each so the quilt wall came in handy (a cheap vinyl table cloth tacked to the wall with the backside out). So, I would cut out a few rows and then get tired of that and start sewing the blocks together. Going from cutting to sewing and back really helped break the monotony.
These pictures show how the cut pieces fit together. Look at the orange fabric and you see the top of the pinwheel.
The picture to the left shows the quilt wall during the process. You can start to see the pinwheel pattern coming together.

The picture to the right shows what was left after cutting out the blocks - so much for the idea of creating a cathedral quilt. I will however keep the 2 inch scraps for smaller blocks or applique on other projects. Nothing goes to waste in this quilters room.
Final product! What do you think? Leave me a comment.

Thursday, May 31, 2012

Charming Baby Quilt

Baby Quilt  before the cut up;-)
I am making a baby quilt for a coworker who has overcome a year of trying to get pregnant and is now about to have her first little one! I am so excited and happy for her and her hubby. It is nice to have seen the whole romance, marriage and subsequential baby - a very unique story. Anyway, I wanted to make something I haven't ever tried before and this little charm quilt was just the ticket.

The instructions are from "Back to Charm School" by Mary Etherington and Connie Tesene - a new book from my crafter's choice book club.

The first part is just making charm squares (5"x5") from 10 different fabrics (8 blocks of each fabric). Then piecing them together in 10 rows of 8 blocks each then add the pink border. This is as far as I have gotten. Next, I get to cut wonky 3.5" squares out of this quilt and carefully keep them in order (99 blocks) and they will get sewn back together in 11 rows of 9 blocks each row. It will make a pinwheel or blocky puzzle piece looking quilt. I will (of course) be posting pictures of the process and of the final product.

Someone asked me what I will do with the rest of the 'cut-up' quilt - I was floored! I hadn't thought about that, but it does seem a waste to discard it. They suggested putting another fabric behind it to make a cathedral quilt. I may do that, or I may applique some owls or large flowers over the holes.

Homemade Trail Mix


A co-worker had a bag of white yogurt covered dried cranberries and asked me to try one.  It rocked my world! But I wanted to do my own version with supplies from my pantry. My first batch just had CRAISINS ( a half a bag that was left from when my daughter and son-in-law lived here) and a half a bag of white chocolate chips. Well, it was a success and I was totally hooked!


A side note : I never liked craisins (dried cranberries) before paring them with the white chocolate.


As you can see in the picture, I also added almonds (with sea salt) in layers in a large jar. Try it, I bet you will like it;-)

Sunday, July 31, 2011

Marshmellow Fondant

I decided to experiment with a simple sounding recipe for marshmellow fondant:
1bag mini-marshmellows
2tbs water
4 cups powdered sugar
1tsp vanilla

The marshmellows and water go into a medium bowl and microwave on high for one minute. Stir with a rubber spatula until all the marshmellows are melted - can microwave for another 30 seconds if needed.
Then it said to add the vanilla, stir, then all the powdered sugar at once. The video I watched showed the person mixing by hand but I used my stand mixer with dough beaters and it worked out very well. Once all the sugar is incorporated then you can knead it on a powdered sugar covered counter until it is not sticky and will not take any more powdered sugar. Wrap it in plastic wrap and let it rest a few hours on the counter.


 This took all of about 5 minutes! The last time I tried homemade fondant, it took hours and did not turn out at all - it ended up in the trash can. This is so  liberating! It is fun and easy to work with, it tastes great, and it looks wonderful on the cake. It can be a bit sticky at times, like when you are adding color. It does dry out after a while, but it can be reheated in the microwave to make it easier to work with. I am in love with this stuff. It really opens up the door to creativity! Did I mention it tastes great?