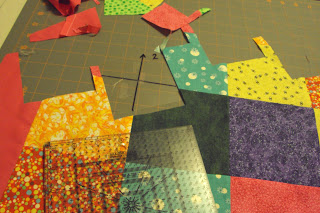
 Cutting out the 3.5x3.5 tilted squares from the block baby quilt turned out to be a bit trickier than I had originally planned. The first template I made (out of clear plastic) didn't include an orientation arrow or a number to show which side is correct, so the first 3 squares I cut were wrong - there was no fixing them - I had to cut and sew the top row all over again.
So, learning from my mistake - I made a clear template that included an orientation arrow and a number so I could tell I had it turned right and oriented right. Much better! (I didn't take a picture of the mistake - sorry).
 I had to carefully label each block with the row number and block number. (example row 3, block 1 would be 3-1). There were 11 rows of 9 blocks each so the quilt wall came in handy (a cheap vinyl table cloth tacked to the wall with the backside out). So, I would cut out a few rows and then get tired of that and start sewing the blocks together. Going from cutting to sewing and back really helped break the monotony.
 These pictures show how the cut pieces fit together. Look at the orange fabric and you see the top of the pinwheel.
  The picture to the left shows the quilt wall during the process. You can start to see the pinwheel pattern coming together.
 The picture to the right shows what was left after cutting out the blocks - so much for the idea of creating a cathedral quilt. I will however keep the 2 inch scraps for smaller blocks or applique on other projects. Nothing goes to waste in this quilters room.
Final product! What do you think? Leave me a comment.

No comments:
Post a Comment